Getting Started with Google Kubernetes Engine (GKE)
A Complete Guide for Cloud Native Beginners and Tech Leads
Introduction to Google Kubernetes Engine (GKE)
What Is GKE?
Google Kubernetes Engine (GKE) is a managed Kubernetes service offered by Google Cloud Platform that handles the provisioning, maintenance, and lifecycle of Kubernetes clusters. Rather than manually installing and operating Kubernetes control plane components — the API server, etcd, the scheduler, and the controller manager — GKE abstracts that burden away so that teams can focus on deploying and scaling their applications (Google Cloud, 2024a).
Kubernetes itself originated at Google, evolving from an internal system called Borg that managed containerized workloads across Google’s global infrastructure for over a decade (Burns et al., 2016). GKE inherits this lineage directly: it runs on the same infrastructure that powers Google Search, YouTube, and Gmail, giving users access to a battle-tested orchestration platform without the operational cost of running it themselves.
Key Features
Autopilot and Standard Modes. GKE offers two modes of operation. In Autopilot mode, Google manages the entire node infrastructure, including provisioning, scaling, security hardening, and OS upgrades. You pay only for the CPU, memory, and storage your pods actually request. In Standard mode, you retain full control over node pools, machine types, autoscaling policies, and scheduling configuration (Google Cloud, 2024b). For beginners, Autopilot is the recommended starting point; for teams with specific hardware, GPU, or compliance requirements, Standard provides the necessary control surface.
Node Pools and Autoscaling. A node pool is a group of virtual machines within a cluster that share the same configuration — machine type, disk size, labels, and taints. GKE supports multiple node pools per cluster, enabling workload isolation (for example, a general-purpose pool for web services alongside a high-memory pool for caching layers). The Cluster Autoscaler automatically adjusts the number of nodes based on pending pod resource requests, scaling from zero to thousands of nodes (Google Cloud, 2024c).
Security. GKE provides multiple layers of defense: Shielded GKE Nodes with Secure Boot and vTPM, Workload Identity for pod-level IAM authentication (eliminating the need for exported service account keys), Binary Authorization for image provenance enforcement, and network policies for east-west traffic segmentation. Autopilot clusters come with these security features pre-configured and enforced by default (Google Cloud, 2024d).
Integrated Observability. Every GKE cluster integrates natively with Google Cloud’s operations suite. Cloud Logging collects container stdout/stderr and system logs automatically. Cloud Monitoring provides pre-built dashboards for cluster, node, pod, and container metrics. Google Cloud Managed Service for Prometheus enables custom metrics collection using the Prometheus data model without operating a Prometheus server (Google Cloud, 2024e).
Networking. GKE uses VPC-native networking by default, assigning pod IP addresses from a secondary range within the VPC subnet. This eliminates NAT overhead, makes pods directly routable within the VPC, and integrates seamlessly with Cloud Load Balancing, Cloud Armor (WAF/DDoS), and Cloud CDN.
When and Why Teams Choose GKE
GKE is a strong fit when teams need to run containerized microservices at scale and want the operational overhead of Kubernetes management handled by the cloud provider. Common scenarios include:
- Microservices architectures that benefit from Kubernetes-native service discovery, rolling deployments, and horizontal pod autoscaling.
- CI/CD pipelines that deploy multiple times per day and need rapid, declarative rollouts with automatic rollback capability.
- Hybrid or multi-cloud strategies leveraging GKE Enterprise (formerly Anthos) to manage clusters across GCP, on-premises, and other clouds through a unified control plane.
- Machine learning workloads requiring GPU/TPU node pools with per-job autoscaling, managed by Kubernetes Job and CronJob primitives.
If the workload is a single stateless container with no orchestration complexity, Cloud Run (Google’s serverless container platform) may be a simpler choice. GKE becomes the right tool when your system involves multiple services, stateful components, custom scheduling requirements, or when your team has invested in the Kubernetes ecosystem of tooling — Helm, Kustomize, ArgoCD, Istio.
The Role of Kubernetes in Cloud Native Architecture
The Cloud Native Computing Foundation (CNCF) defines cloud native technologies as those that enable organizations to build and run scalable applications in modern, dynamic environments such as public clouds, private clouds, and hybrid configurations (CNCF, 2018). Kubernetes sits at the center of this ecosystem as the de facto container orchestration standard. It provides the foundational primitives — Pods, Deployments, Services, ConfigMaps, Secrets, Ingress — upon which higher-level abstractions (service meshes, GitOps controllers, serverless frameworks) are built. Choosing a managed Kubernetes service like GKE means adopting this ecosystem without bearing the operational cost of the platform itself.
Installing Required Tools
Before creating a GKE cluster, three tools must be installed on your workstation: the Google Cloud CLI (gcloud), Docker, and kubectl. This section covers installation across WSL2 (Windows Subsystem for Linux), RPM-based distributions (RHEL, CentOS, Fedora), and DEB-based distributions (Ubuntu, Debian).
Note: WSL2 runs a full Linux kernel and uses the Ubuntu/Debian package manager by default. Unless otherwise noted, the DEB-based instructions apply directly to WSL2.
Google Cloud CLI (gcloud)
The gcloud CLI is the primary tool for interacting with Google Cloud from the terminal. It wraps the same REST APIs that power the Cloud Console, making every operation scriptable and repeatable (Google Cloud, 2026a).
Installation
DEB-based (Ubuntu, Debian, WSL2):
| |
RPM-based (RHEL, CentOS, Fedora):
| |
Initialization and Authentication
After installation, initialize gcloud to authenticate and set a default project:
| |
Enable Required APIs
GKE requires several APIs to be enabled in your project:
| |
Docker CLI
Docker is needed to build and test container images locally before pushing them to a registry. On GKE, the container runtime is containerd (managed by Google), but Docker remains the standard tool for local development.
DEB-based (Ubuntu, Debian, WSL2):
| |
RPM-based (RHEL, CentOS, Fedora):
| |
Verify Docker is working:
| |
You should see a message confirming Docker can pull images and run containers.
Kubernetes CLI (kubectl)
kubectl is the command-line interface for communicating with the Kubernetes API server. It reads cluster connection details from a kubeconfig file (typically ~/.kube/config) and translates your commands into API requests.
Installation
Option A — Install via gcloud (recommended for GKE users):
| |
Option B — Install via native package manager:
DEB-based:
| |
RPM-based:
| |
Version Check and Cluster Connection
| |
The get-credentials command writes the cluster’s API endpoint, CA certificate, and authentication configuration into your ~/.kube/config file. From that point forward, all kubectl commands target the GKE cluster.
Creating a GKE Cluster Using Google Cloud CLI
This section walks through creating a production-ready GKE Standard cluster, verifying its health, and confirming it is ready for workloads.
Why Standard mode for this guide? Standard mode exposes the full set of Kubernetes and GKE configuration options, which is valuable for learning. Once you are comfortable with the concepts, Autopilot is the recommended mode for most production workloads — it requires fewer flags and manages node infrastructure automatically.
Create a Regional Cluster
A regional cluster distributes the control plane and nodes across three zones within a region, providing higher availability than a single-zone cluster. This is the recommended topology for any workload that requires uptime (Google Cloud, 2024f).
| |
Flag Breakdown:
| Flag | Purpose |
|---|---|
--region | Creates a regional cluster (3 zones) instead of zonal |
--num-nodes=1 | 1 node per zone — so 3 nodes total for a regional cluster |
--machine-type=e2-medium | 2 vCPU, 4 GB RAM — suitable for lab and lightweight workloads |
--enable-ip-alias | VPC-native networking; pods get routable IPs from a VPC secondary range |
--enable-autorepair | GKE automatically recreates unhealthy nodes |
--enable-autoupgrade | GKE automatically upgrades node versions within the release channel |
--enable-autoscaling | Cluster Autoscaler enabled with min/max boundaries |
--workload-pool | Enables Workload Identity for pod-level IAM authentication |
--release-channel=regular | Balances stability with feature availability |
--logging / --monitoring | Enables Cloud Logging and Cloud Monitoring components |
Monitor Cluster Creation
Cluster creation takes 5–10 minutes. You can monitor progress with:
| |
Retrieve Cluster Credentials
Once the cluster is ready, connect kubectl:
| |
Validate Cluster Health
Run the following checks to confirm the cluster is operational:
| |
Expected output for node check:
| |
All three nodes should show STATUS: Ready. If any node shows NotReady, wait a few minutes — the node may still be bootstrapping.
Deploying a Simple Web Application
With the cluster healthy, let’s deploy a containerized web application. We will use Nginx as a minimal example — it is a well-known, lightweight web server that demonstrates the core Kubernetes deployment primitives without requiring you to build a custom container image.
Create the Deployment Manifest
A Deployment declares the desired state: which container image to run, how many replicas, and what resources each replica should consume.
Create a file named nginx-deployment.yaml:
| |
Key details:
replicas: 3— runs three identical pods spread across the cluster’s nodes.resources.requests— tells the scheduler how much CPU and memory each pod needs. The Cluster Autoscaler uses these values to decide whether to add nodes.resources.limits— hard ceiling; if a container exceeds its memory limit, Kubernetes kills and restarts it.livenessProbe— checks if the container is alive. If it fails, Kubernetes restarts the container.readinessProbe— checks if the container is ready to receive traffic. Pods that fail readiness are removed from the Service’s endpoint list.RollingUpdatestrategy withmaxUnavailable: 0— ensures zero downtime during deployments.
Create the Service Manifest
A Service provides a stable network endpoint for the pods. A LoadBalancer type Service provisions a Google Cloud Network Load Balancer with a public IP address.
Create a file named nginx-service.yaml:
| |
Apply the Manifests
| |
Monitor the Deployment
| |
Get the External IP
The LoadBalancer provisioning takes 1–3 minutes. Watch for the EXTERNAL-IP to transition from <pending> to a public IP:
| |
Test the Application
| |
Open http://<EXTERNAL_IP> in a browser — you should see the “Welcome to nginx!” page.
View Logs
| |
Clean Up
When finished experimenting:
| |
Creating the Same GKE Cluster Using Terraform
Terraform enables you to define your GKE cluster as code — versioned, reviewed, and reproducible. This section provides a minimal Terraform project that creates the same cluster built in Section 3.
Project Structure
| |
versions.tf
| |
variables.tf
| |
main.tf
| |
outputs.tf
| |
terraform.tfvars
| |
Commands to Initialize, Plan, and Apply
| |
Retrieve Cluster Credentials After Terraform Provisioning
After terraform apply completes, use the output to connect kubectl:
| |
Tear Down
| |
Advantages of Using GKE for This Deployment
Operational Simplicity
GKE removes the heaviest operational burden from Kubernetes adoption: running and securing the control plane. The API server, etcd, scheduler, and controller manager are managed, patched, and scaled by Google — with a financially backed 99.95% SLA for regional clusters (Google Cloud, 2024f). Your team can direct its engineering effort toward application delivery rather than cluster babysitting.
Automatic Upgrades and Repair
With release channels, GKE automatically upgrades both the control plane and nodes to tested Kubernetes versions. Node auto-repair monitors node health via periodic checks; if a node fails its health check, GKE drains it, deletes it, and provisions a fresh replacement — without human intervention (Google Cloud, 2024c). This self-healing behavior is difficult and time-consuming to replicate on self-managed Kubernetes.
Deep GCP Ecosystem Integration
GKE is not an isolated service. It integrates directly with:
- Cloud Load Balancing — exposing Services as
LoadBalancertype automatically provisions L4/L7 load balancers. - Cloud IAM + Workload Identity — pods authenticate to Google Cloud APIs with per-service-account credentials, eliminating the antipattern of mounting JSON keys as Kubernetes Secrets.
- Artifact Registry — private container image storage with vulnerability scanning.
- Cloud Build — serverless CI/CD that builds images and deploys to GKE through declarative pipelines.
- Secret Manager — external secret storage that can be synced into Kubernetes Secrets using the Secrets Store CSI Driver.
Built-in Observability
Every cluster created in this guide ships with Cloud Logging and Cloud Monitoring enabled. Container logs are collected and indexed without deploying a Fluentd/Fluentbit DaemonSet. Metrics are scraped and stored without managing a Prometheus/Grafana stack. For teams graduating from virtual machines to containers, this eliminates the “observability gap” that often accompanies Kubernetes adoption.
Scalability and Reliability
The Cluster Autoscaler, combined with Horizontal Pod Autoscaler (HPA) and Vertical Pod Autoscaler (VPA), creates a multi-layer scaling system. Pods scale based on CPU, memory, or custom metrics; the cluster provisions additional nodes when pending pods cannot be scheduled. Regional clusters distribute workloads across three availability zones. This architecture handles everything from steady-state API traffic to spike-driven event processing.
Enterprise-Grade Security
GKE’s defense-in-depth posture includes:
- Shielded Nodes — Secure Boot ensures only verified software runs on the node’s boot chain.
- Binary Authorization — enforce that only signed, trusted container images can be deployed.
- Network Policies — define which pods can communicate with which, enforced by the Dataplane V2 (Cilium-based eBPF implementation).
- GKE Security Posture Dashboard — scans workloads against CIS Kubernetes Benchmarks and flags misconfigurations.
For organizations subject to compliance frameworks (SOC 2, ISO 27001, HIPAA, PCI DSS), GKE provides the controls and audit trails required to meet these standards (Google Cloud, 2024d).
Conclusion
Google Kubernetes Engine democratizes Kubernetes adoption by removing the operational complexity of running a container orchestration platform. This guide has walked you through the essentials: understanding what GKE is and when to use it, installing the required tools (gcloud, Docker, kubectl), provisioning a production-ready regional cluster via both the CLI and Terraform, and deploying a containerized application end-to-end.
The journey from local containerization to managed Kubernetes need not be daunting. By leveraging GKE’s automation—Autopilot or Standard mode, automatic upgrades, node repair, integrated observability—you sidestep the pitfalls that derail many Kubernetes projects: control plane availability, security patching, and observability instrumentation.
Next steps:
- Deploy a real workload. Replace the Nginx example with one of your microservices. Refine resource requests and limits based on observed behavior.
- Explore Autopilot. Once comfortable with Standard mode concepts, Autopilot removes node management entirely, reducing configuration surface area.
- Implement GitOps. Adopt ArgoCD or Flux to make your cluster state declarative and version-controlled—the foundation of repeatable, auditable deployments.
- Deepen observability. Layer in custom metrics, distributed tracing (Cloud Trace), and profiling (Cloud Profiler) to understand application behavior under load.
- Adopt service mesh (optional). Istio or Anthos Service Mesh provide traffic management, security policies, and observability, valuable as your system grows.
The cloud-native ecosystem is vast, but GKE is a solid, opinionated entry point that scales from a single developer’s lab cluster to enterprise workloads serving millions of users. Start small, iterate, and grow your confidence with each deployment.
Graphic: GKE Deciphered: A Beginners Journey to Managed Kubernetes
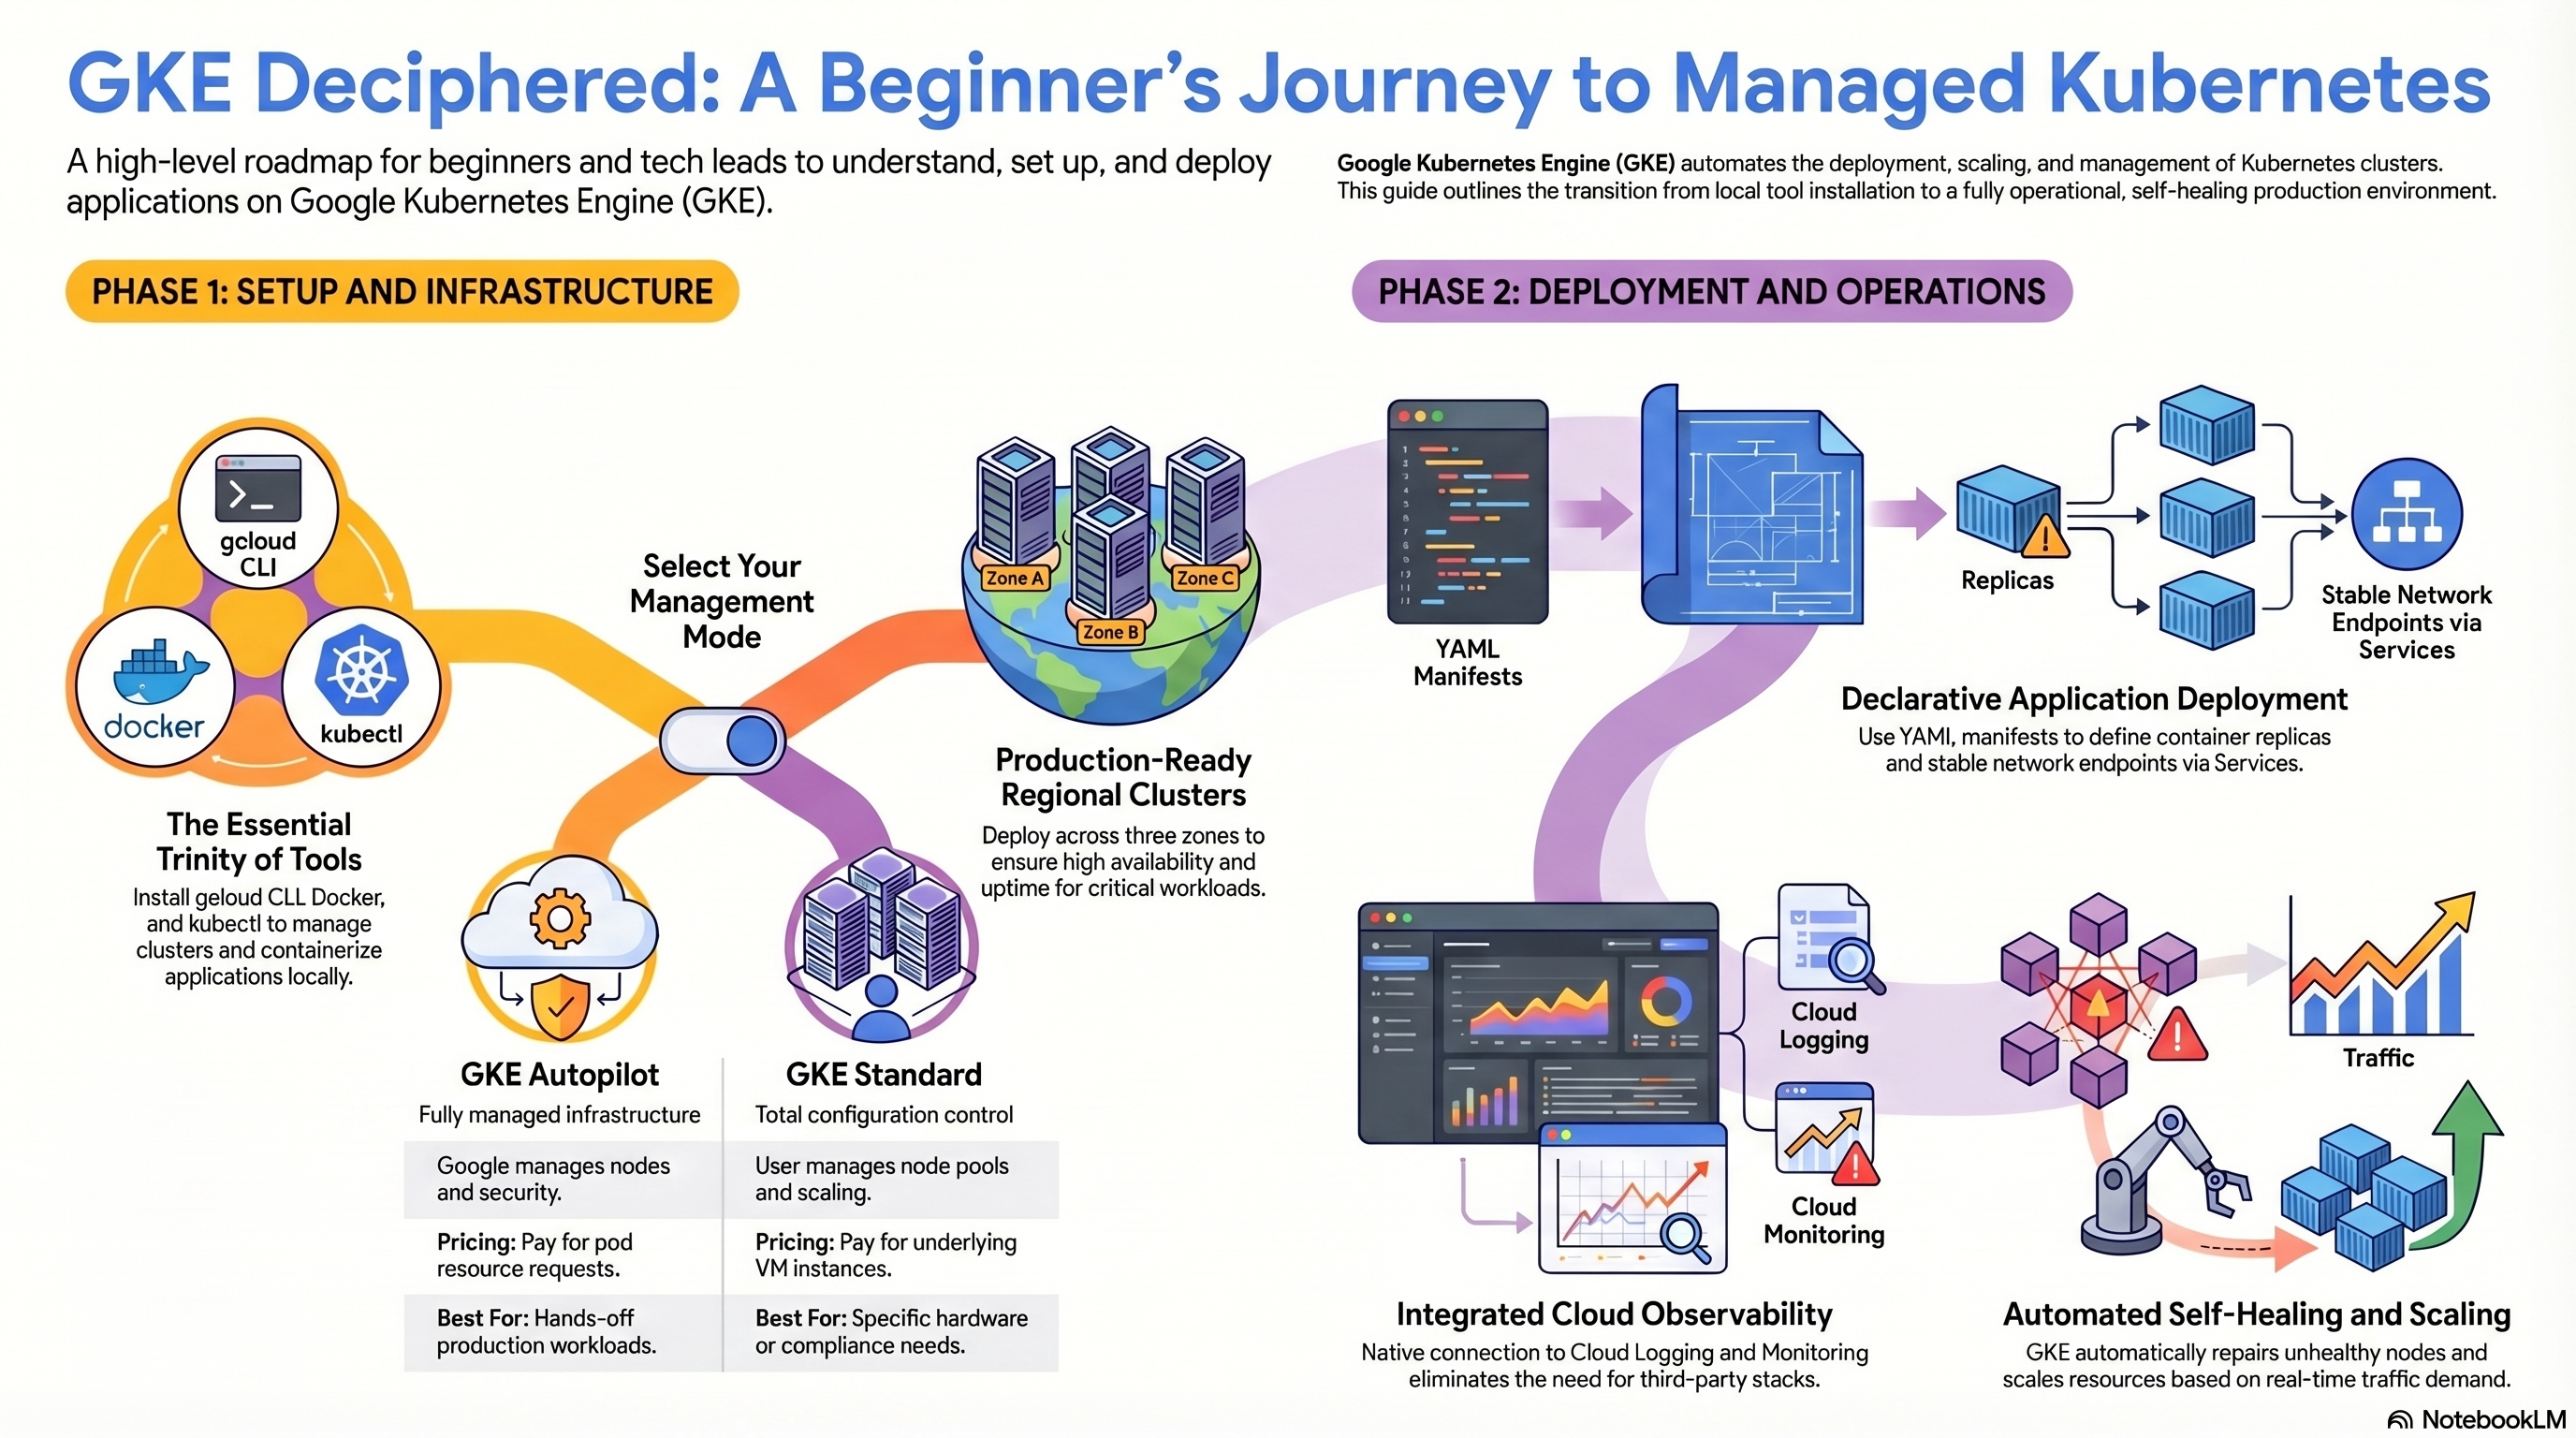
This visual roadmap illustrates the two-phase progression from setup to production deployment. Phase 1 covers the essential trinity of tools—gcloud CLI, Docker, and kubectl—along with two GKE operational modes: Autopilot (fully managed infrastructure, pay per pod resources) and Standard (full configuration control, pay per VM instances). Phase 2 depicts deployment workflows, including YAML manifest authoring, declarative application deployment with replicas and stable network endpoints via Services, integrated cloud logging and monitoring, and automated self-healing and scaling driven by traffic demand. The diagram reinforces that GKE abstracts Kubernetes cluster management, enabling teams to focus on application delivery rather than platform operations.
References
Burns, B., Grant, B., Oppenheimer, D., Brewer, E., & Wilkes, J. (2016). Borg, Omega, and Kubernetes: Lessons learned from three container-management systems over a decade. ACM Queue, 14(1), 70–93. https://queue.acm.org/detail.cfm?id=2898444
Cloud Native Computing Foundation. (2018). CNCF cloud native definition v1.0. https://github.com/cncf/toc/blob/main/DEFINITION.md
Google Cloud. (2024a). GKE overview. Google Cloud Documentation. https://cloud.google.com/kubernetes-engine/docs/concepts/kubernetes-engine-overview
Google Cloud. (2024b). About GKE modes of operation. Google Cloud Documentation. https://cloud.google.com/kubernetes-engine/docs/concepts/choose-cluster-mode
Google Cloud. (2024c). Cluster autoscaler overview. Google Cloud Documentation. https://cloud.google.com/kubernetes-engine/docs/concepts/cluster-autoscaler
Google Cloud. (2024d). GKE security overview. Google Cloud Documentation. https://cloud.google.com/kubernetes-engine/docs/concepts/security-overview
Google Cloud. (2024e). GKE observability overview. Google Cloud Documentation. https://cloud.google.com/kubernetes-engine/docs/concepts/observability
Google Cloud. (2024f). Regional clusters. Google Cloud Documentation. https://cloud.google.com/kubernetes-engine/docs/concepts/regional-clusters
Google Cloud. (2026a). Install the Google Cloud CLI. Google Cloud Documentation. https://cloud.google.com/sdk/docs/install-sdk
HashiCorp. (2024). Google provider: google_container_cluster. Terraform Registry. https://registry.terraform.io/providers/hashicorp/google/latest/docs/resources/container_cluster